Pinball Arcade in my Pinball / Arcade cabinet in Pinball X with video backglass, etc.

TerryRed

New member
Feb 7, 2016
48
0
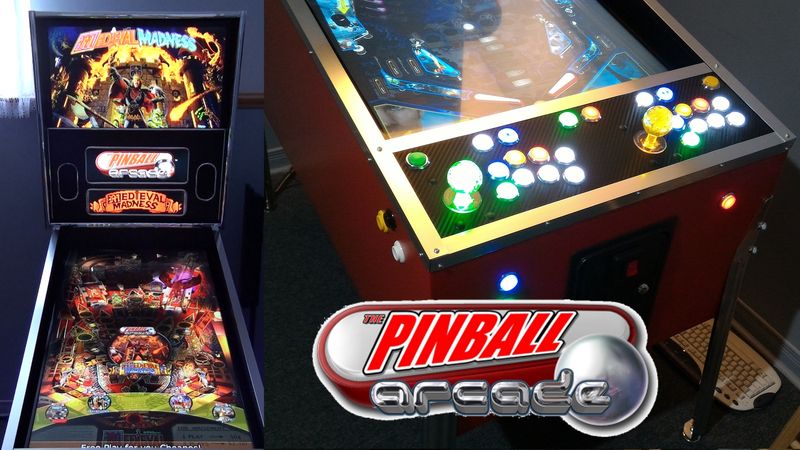
Here is a video of The Pinball Arcade using the camera mod with video backglasses, a TPA "marquee" and DMD on the 3rd screen all running in my custom Pinball / Arcade cabinet that I built. It's being shown on Pinball X as a frontend.


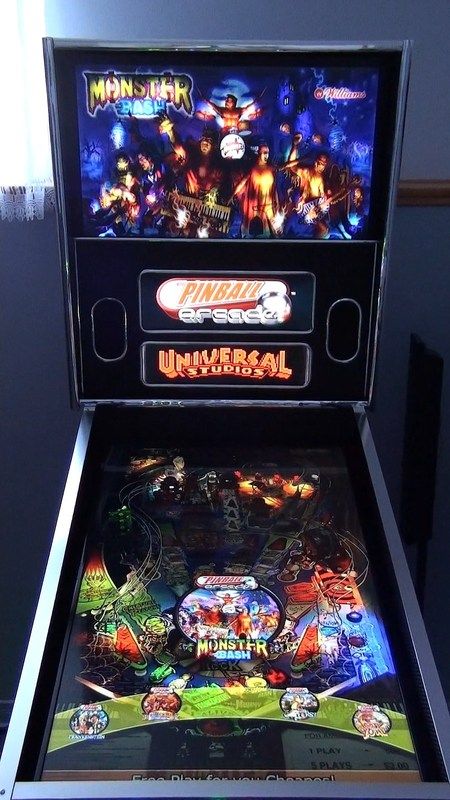
https://www.youtube.com/watch?v=xZJub0Z1Emg


....and another picture:

 
Last edited:

TerryRed

New member
Feb 7, 2016
48
0
Here's the build process:


I'm a 42 year old guy who grew up in arcades in the 80's and 90's. I love arcade games and pinball, and video games in general. I've also been an electronics technician for 20 years. (15 as a civvie, 5 in the military)

This WAS my mancave a while ago. It housed my custom simpit that I made for racing and flight sim games. It had three 42 inch TVs for surround view, as well as 12 transducers combined with SimVibe software to give vibrational feeback from telemetry data from the racing games I played. The console on the right rotates around to switch between a shifter and flightstick. The dash has two tablets that act as tachometer / speedometer, and a button box / control panel. I love it!


That being said, I always thought the 3 screens (that spanned almost 10 feet!) were a bit much. So when I got myself a 55 inch UHD 4K curved TV, for my normal PC gaming, I found I loved playing my racing games on it much better. I would get 2/3 of the same visible screen field of view that I had with 3 screens using a custom 21:9 resolution of 3840x1640, with much nicer colour and resolution. Also, with VR headsets coming out, I wouldn't be using those screens as much when I (someday) get one.


So I decided to ditch the 3 screens setup and use them to make a combination Pinball and Arcade cabinet that would also play PC games! (I can move the simpit in front of my UHD TV's new location easily when I want to use it).


Commence the start of the creation of PinKadia!

After reading ALOT of posts of other projects, here is where my priorities were, and what I wanted:

-I wanted something that would play Future Pinball, Pinball FX2, The Pinball Arcade, MAME Arcade games, and PC games (ie fighting and action games)
-I wanted two player controls with actual (PC / Xbox 360 / One) hardware for maximum compatibility and ease for all games
-it had to be made using many of the components I already had (I already had most of the electronics needed)
-it had to be made as cheaply as possible to keep me from becoming single (my wife is not a big gamer)

Things that will come later on down the line and were not a priority:

-Visual Pinball
-DOF, LED controlled lighting, feedback, etc
-printed artwork
- or otherwords... anything really costly that I didn't already have.


So I came up with this mock-up to tide me over and help me figure exactly what I wanted.


What a beauty.... boy the wife just "LOVED" seeing this in my mancave for weeks on end.... but it really helped me tinker with different ideas instead of rushing into things. What I found was that I wanted to have a 3 screen setup, and I wanted to make use of the ENTIRE 3rd screen. Not just for the DMD like everyone else, but also to extend the backglass (only possible with Future Pinball) to make use of the excellent movie clips / colour DMDs / gadgets and other things you could see in Future Pinball. I HATE trying to "squish" a square backglass into a wide rectangular screen. This would allow me to make use of that space in a good way!

Both Pinball FX2 and The Pinball Arcade can now support DMD / displays on the third screen (TPA uses a mod, PBFX2 has native support now). So with the extra space left over on the 3rd screen, I can put nice animated logos or whatever I want there using Pinball X as a frontend, as well as having animated videos for the backglass.

By having arcade controls on the cabinet this would also allow me to play MAME vertical games on the playfield, and MAME horizontal games on the backglass. I could also play almost any PC action game on the backglass as well.

I also wanted to make use of my 5.1 speakers in the cabinet.


So on with the build... I began with de-bezeling one of my 42 inch TVs, only to find that the main support for the framing of the TV came for the plastic housing itself. (This is because this TV is not an edge-lit LED TV, its a back-lit LED TV) So I had to keep the TV housing fastened together.


I cut off the plastic for the IR / Power LED, and control PCB. I just taped the PCB on the bottom of the TV where it won't be seen.


For the size of the cabinet itself, I used the standard Williams Widebody plans that you can find all over the Internet. I then adjusted to sizes to work with my 3 screens. 42 inch TV for playfield, 27 inch monitor for backglass, 19 inch 4:3 monitor for DMD / extended backglass. I had found a place here in Canada that had Pinball legs and bolts for a decent price. The Canadian dollar is horrible right now, so getting anything from the States can be expensive.

I waited until the wife went on her monthly day trip to Ottawa, so I could get to work without distractions....or arguments. :(
 

TerryRed

New member
Feb 7, 2016
48
0
I was able to get the materials I needed and get the following built while she was gone.


What a surprise she had coming home to find her husband in the driveway cutting MDF board with his military gas mask on! ;) I think she knew I was too anxious to get her out of the house that day. :)

This was a mock up for the arcade controls...I tried a couple of different layouts to see how I would like it.


Three buttons on the side. Main flipper, 2nd flipper / special, and nudge. I personally can do without a "real" nudge control for now. A plunger was also not a priority either. That may come later. So I just have a normal button for now until i get a big dome type Launch button. The coin door is not for functionality, but just for looks and simple access. Maybe i'll get it working later on.


Now comes the sucky part.... taking it apart for mudding. All open cut parts of the MDF were sealed with dry wall compound. Other areas were covered with wood filler.


Then all the sanding which made a lovely dusty mess in the mancave.


TerryRed

New member
Feb 7, 2016
48
0
Finally, i got to put on the oil-based (no-scent) primer to help seal the MDF for painting. Then I painted the inside and back of the cabinet black. the outside was painted with "amazing" red.


Now I could put everything back together. I installed chrome T-molding for the backglass. Then I installed the "front" speakers, backlgass 27 inch monitor, and 19 inch DMD / extension monitor. The 19 inch monitor sits only a little bit inside the lower cabinet.


The back of the cabinet has two small fans and a door for the backglass screens, and two large fans and a door for the lower cabinet. I also made some extra vent / access holes for cabling that may be needed in the future. the fans draw air out of the cabinet.


The back door allows access to the PC and cabling. The PC is mounted on a shelf on rails, so it can just slide out of the back for access if needed.


For the PC I used some mounting hardware from an old server case. I originally had on old i5 dual core CPU and server motherboard, but that got replaced with an i5 2500K later on. Dual core cpu worked fine for mostly everything, except when it came to playing 3 videos at once through Pinball X. Quad core cpu was needed for that. PC specs are:

i5 2500K quad core cpu
8 gigs ddr3 1600 ram
nvidia gtx 960 video card (all 3 screens connected to this one video card, via HDMI, DVI, display port)
750 watt power supply
250 gig ssd
500 gig hard drive
sound blaster audigy 2 sound card for 5.1 sound (that was removed when the motherboard was changed).
logitech 5.1 speaker system (older set i've had for years)


TerryRed

New member
Feb 7, 2016
48
0
Here's the subwoofer and air-intake fan that brings fresh cool air into the cabinet.


This is where the rear speakers are mounted. I actually swapped the front and rear speakers so I could reach under the cabinet and adjust the volume if need be. (I had to swap the audio cables on the sound card for this to work) The center speaker will go in the middle hole.


Now for the controls! I decided to use two Logitech F310 gamepads for two players and for pinball controls:

-they are really cheap
-they provide both direct-input and x-input compatibility
-they are completely xbox 360 compatible (which works with ALL games / emulators). No need for xpadder-like software.
-they have a button that allows the functions of the d-pad and left analogue stick to swap. VERY important as some games won't allow some functions to work with the d-pad. The d-pad is what I will be using for the arcade stick. This allows me to have d-pad and "left analogue stick" functionality at anytime on the arcade joystick at the push of a button. you can't get this with a normal xbox 360 gamepad.

Now the un-fun part. I had to do some reverse engineering to find out how this sucker is wired. I wanted to have all the normal buttons and the "triggers" for buttons as well. You need to replace to potentiometers for the triggers with correct resistor values and hope it works. Unfortunately, getting the triggers to work this way would also mess up the resistance for the analogue sticks. So I eventually had to give up the trigger buttons and use the left and right stick buttons. As a result, I had to make my two center buttons (red/green) the "home" button (for player one and two) which would just open STEAM Big Picture Mode, which I wasn't going to use.

Normally, you only need one common ground when wiring buttons to most gamepads... not this one! It had FIVE different grounds, working with diodes in a matrix encoder. A pain to figure out, but I got 'er done! So I mounted the gamepad to a board and had all the wires I soldered to it goto terminal strips. Then I can have the cabinet's arcade buttons AND the pinball button wires use the same controls off of the player one gamepad.


Unfortunately, I was unable to get the old-school parallel / printer cables (DB-25) I needed to allow the control panel to just "plug-in" to the gamepad board. I was building this part during Christmas holidays, and the very few shops we have around here didn't have any. So I just mounted it anyway with the shorter wires (which I got from a couple of JAMMA harnesses) connected directly. As a result, the player one gamepad and pinball controls all look like this mess. Keep in mind.... most pinball cabinets only have around 10 buttons / controls to wire up.... I have OVER 40, with multiple separate grounds, and LEDS on each button (except the flipper buttons). When I get the cables I need and I'm ambitious this will be mostly gone and all tidied up....either way I won't see it!


As you can see.... the player two gamepad is much tidier.


TerryRed

New member
Feb 7, 2016
48
0
For the control panel, the insides of the playfield walls, backglass walls, and DMD bezel, I decided to use carbon fibre vinyl wrap. I had some left over from the simpit, and liked to way it looked with chrome trim. I'm a sucker for chrome and shiny car stuff. (I used to have a 1971 Chevelle with a custom 415 horsepower engine, but that was another life!) This is one of the few things I could buy around here. (at Walmart or Canadian Tire)


This is how my Layout looks for my screens for Future Pinball. This is required in order to use my extended backglass. Screen 1 is the playfield, screen 2 is the backgass, and screen 3 is the DMD / extended backglass.


Setup Future Pinball the way you normally would for your playfield and backglass. Exit Future Pinball. Then you then MUST configure Future Pinball's backglass resolution MANUALLY through the windows registry... NOT through Future Pinball itself. I have my backglass set to 1920x1600. What this does is, it "extends" the backglass from the 2nd screen down onto the 3rd screen. It can be larger than this, but anything past the bottom of the "translite" in Future Pinball is useless. I also use Future DMD on the bottom of the 3rd screen anyway, because you can't adjust the physical size of the DMD in Future Pinball itself (Future DMD can be ANY size). Overlays (which are used for movie clips, custom colour DMDs, gadgets,etc) can be made to ANY size!


This picture below shows my Future Pinball displays across the 3 screens. The black areas are the unused parts of the windows "desktop". The blue background on screen 3 is the desktop background. (I normally have it black but changed it to blue just for illustration purposes) This is the pinball table with no modification or custom overlays.


This picture shows a custom overlay I made with a simple castle wall picture with extra stats for the game showing (which were normally shown in desktop mode on this particular version of the table). This area can be used for anything you want in Future Pinball!


Here you can see it displayed on my 3rd screen.


For my DMD / Extended backglass bezel, I just made it from thin backboard used for book shelves. I then covered it with carbon fibre vinyl, and covered the edges with automotive chrome trim. I covered the speaker holes with speaker cloth from Fabricland.


TerryRed

New member
Feb 7, 2016
48
0
Now you can see how the bezel makes it look like I have a 4th screen that is separate from the backglass and dmd.


Now I just had to fasten the aluminum trim and throw the playfield TV in...


....and it's ALIVE! PinKadia lives!!!!


TerryRed

New member
Feb 7, 2016
48
0
This is my BAM IR Led tracking hat. I made this for Freetrak / Track IR on my simpit with a ps3 eye camera, and they both work great with BAM Freetrack tracking through FaceTrackNoIR. It looks totally cool!


I replaced my fans because they were used in a server, and were very loud! These new fans are cheap, quiet, and have red leds in them.


Finally I added cheap LED colour-changing lighting that plugs into a molex connector from my cpu power supply. (The sub woofer on the floor is from my home theatre, not the pincab)


This is the only video tour I have for now. I will post some others showing off the uses of the extended backglass alot better, as well as PC, MAME, PBFX2, TPA and FP gameplay, as well as Pinball X.

https://www.youtube.com/watch?v=6EpEymOD6j0


Things to do still:

-add glass to the playfield
-setup mame media (MAME is all setup to play)
-visual pinball
-controlled lighting, DOF, feedback,etc..
-big Launch button
-"maybe" a plunger and tilt
-and whatever seems cool at the time!
 

Metalzoic

New member
Jun 8, 2012
907
0
Holy hell man! Very nice, clean professional looking job there.
The Pinball machine and the racing cockpit. You should be damn proud!
 

mpad

New member
Jan 26, 2014
1,398
0
Very nice!
The edges look a bit sharp where the lockdown bar would be. With serious pinballing (nudging) you might get hurt :)
I was planning something similar with the arcade controls at the front, but I decided to have the edge of the screen very close to the lockdown bar to look down at the flippers. Still have those sticks and buttons lying around... Maybe I make some sort of ad on controller or sth.

Very nice build. Make sure to post some pics / vids with the arcade mame games going on
 

JustinCamp

New member
Sep 23, 2015
54
0
Alright, also where do I find more about futurepinball...he has all the tables i want in digital format......someone please give me a hint because I do not have much free time and I need to know more...
 

switch3flip

Member
Jan 30, 2013
944
0
Holy crap by the power of greyskull that vid is awesome I didn't even know there was such a thing it looks incredible! The way everything just pops out when you turn the tracking on :eek:
 

TerryRed

New member
Feb 7, 2016
48
0
Nice to see you here loafer. Just started watching some of your videos on YT!

I'm currently in Pembroke, Ontario but I grew up in the Chatham and Windsor area. It's nice seeing so many Canadians with this hobby.
 

Rudy hates me

New member
Jan 13, 2014
148
0
Amazing work. I envy your ability and patience to do something like this (any attempt by myself would be an unfinished work of pure comedy). Enjoy the fruits of your hard work.
 

Members online

No members online now.

Members online

No members online now.
Top